If you develop WordPress sites using Crocoblock, you know the bottleneck of setting up Custom Post Types (CPTs) and meta boxes. Manually creating dozens of meta fields in the JetEngine UI is slow, and copying JSON structures by hand is prone to errors.
While developers often turn to AI to speed this up, standard AI tools frequently generate incorrect or inconsistent JSON schemas that JetEngine rejects. Debugging broken field structures wastes more time than it saves.
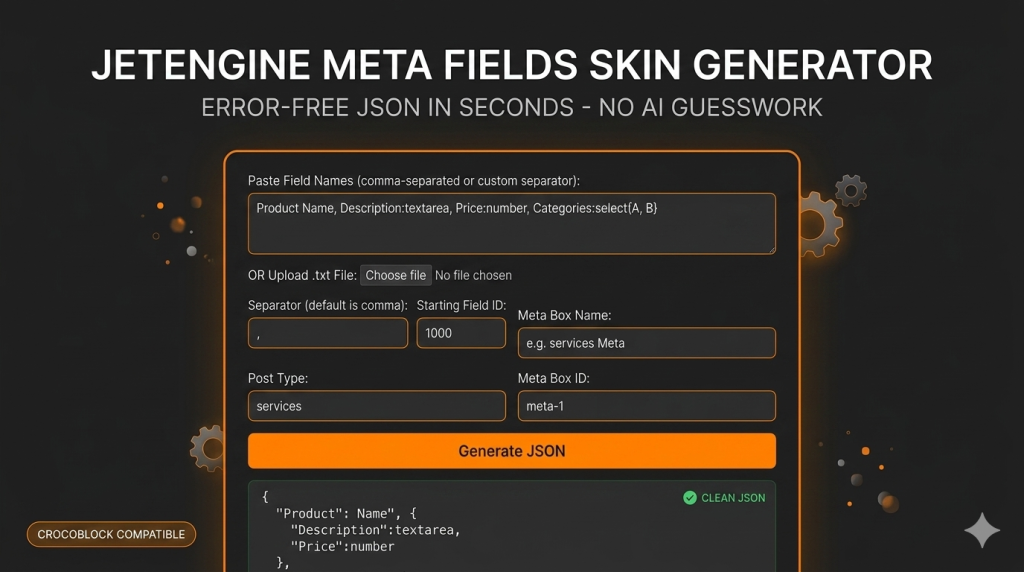
The JetEngine Meta Fields Skin Generator is a completely free tool built to solve this exact problem. It converts your simple text strings directly into clean, valid, JetEngine-ready JSON instantly.
What the JetEngine Meta Fields Generator Does
This tool eliminates the guesswork of building meta fields. You simply provide a basic text list, and the tool outputs the exact JSON required for import.
- 100% Free to Use: No subscriptions, no “pro” versions, and no account required.
- Convert simple text into JetEngine-compatible meta field arrays.
- Generate structured JSON instantly with zero syntax errors.
- Process data via direct text input or by uploading a
.txtfile. - Native support for core field types:
text,textarea,number,date,media,select,checkbox, andradio.
There are no plugins to install and no complex configurations. Access the tool at revisions, input your fields, and generate the JSON for your next JetEngine project.
Why This Tool Outperforms AI for JetEngine JSON
Using standard AI models to generate JetEngine export files often leads to structural failures. Common AI errors include:
- Missing required JetEngine keys (like internal field names vs. labels).
- Broken nesting within option arrays for select/radio fields.
- Inconsistent field type declarations.
- Extra, unnecessary wrapping code that breaks the import.
This generator relies on strict formatting rules designed exclusively for JetEngine compatibility, ensuring a perfect import every time.
Format Guide: How to Use the Syntax
You do not need to write complex prompts. Follow a straightforward text format. Use commas (or your selected separator) to separate different fields.
Basic Structure
Field Title:type{Option 1, Option 2}
- Field Title: The display name of your field (the tool automatically generates the lowercase, underscored internal name).
- :type: The field type. This is optional and defaults to
text. - {Option 1, Option 2}: The choices required for
select,checkbox, orradiofields.
Syntax Examples
- Basic Text Fields:
Name, Email, Phone Number - Fields with Custom Types:
Price:number, Launch Date:date, Description:textarea, Product Image:media - Fields with Options:
Status:select{Active, Inactive}, Subscribe:checkbox{Yes, No}
💡 Pro Tip: Use AI to Format Your Fields
If you have a massive, unformatted list of fields from a client brief, do not waste time fixing them manually. Use an AI tool to clean your data into our supported syntax first, then paste it here for the final JSON conversion.
Copy and use this prompt to prepare your data:
I have a raw list of custom fields for a WordPress JetEngine build. Please convert this list into a single comma-separated string based on the following rules:
- Separate each field with a comma.
- If a field type is implied or mentioned (text, number, date, media, textarea, select, radio, checkbox), append it to the field name using a colon (e.g., Price:number). Default to no type if it is a standard text field.
- If there are options for select, radio, or checkbox fields, wrap them in curly braces immediately after the type (e.g., Status:select{Active, Inactive}).
- Output ONLY the final comma-separated string. Do not include any JSON, code blocks, or explanatory text.
Here is my raw list: [PASTE YOUR MESSY LIST HERE]
The Workflow
- Input: Paste your formatted text or upload a
.txtfile to the Skin Generator. - Configure: Select your field separator and set your Starting Field ID (default is 1000).
- Identify: Provide your Meta Box Name, Post Type, and Meta Box ID to match your WordPress setup.
- Generate: Click generate to create the file.
- Deploy: Copy the validated JSON and paste it directly into the JetEngine Meta Fields import area.
Who Should Use This Tool?
- WordPress Developers building complex directory or dynamic sites with JetEngine.
- Web Agencies looking to speed up the architecture phase of client projects.
- Freelancers who need to bulk-create custom fields without repetitive clicking.
- No-Code Builders who require clean, reliable data structures.
JetEngine is incredibly powerful, but manually managing large datasets of custom fields slows down development. Use the JetEngine Meta Fields Skin Generator to remove the friction, bypass AI hallucinations, and get structured output that works instantly—for free.